Sunday, April 29, 2007

Cross-table C-spine Quick-Tip

This is just a practical tip that I like to show all of my current students at their clinical rotations to improve on efficiency. If the room is set up like this, the patient should only need to be in the room for a matter of seconds to clear the collar (plus whatever time it takes you to hunt down a Radiologist to look at your film).


Make sure you have all of your technical factors pre-set and that you have a 10x12 film loaded crosswise into the upright bucky. Place your left marker in the upper right corner of your pre-collimated light field (the more you collimate, the farther down the spine you will be able to visualize). Make sure the center of the bucky is relatively low to accommodate the stretcher laying flat. I like to put it about mid-femur to my hight. Align the CR with the bucky and don't move it any more.


Bring the patient in the room on the stretcher and either elevate it or lower it to align with your lightfield. This prevents the awkward alignment of the central ray with the bucky after the patient is obstructing your view of the crosshairs.


Make sure to remember to lower the shoulders before you take your exposure. The swimmer's view can be done in the same fashion if needed.

Wednesday, April 25, 2007

Inside Terrorism

Thank you Jim for providing me this link:

Inside Terrorism

This looks like it will be an interesting show to attend!

Tuesday, April 24, 2007

BE "Tips"

Okay, I can't take the credit for the clever title, or the suggestion for the topic... they were given to me courtesy of one of my students (soon to be graduates), Matt. Kudos to Matt!

This post is dedicated to practical tidbits of information that contribute to the performance of a smooth BE. I know when I graduated, I didn't feel that comfortable performing them, and then all of a sudden I was expected to be a barium-slinging super-tech once I got the "RT(R)" behind my name. I hope some if this helps.

A thorough history is important for BE's. I like to double check to see if the patient has had an endoscopy recently, or if they have had a recent biopsy. Depending on your hospital's routine for waiting after a biopsy, you may not do the procedure, or it will change to single contrast due to risk of perforation.

Ask about usage of laxatives... if there has been long-term use, the patient may very well have increased elasticity of the large intestine to a condition called megacolon. It would be a good idea to have some additional barium and/or supplies ready if this is the case.

Another thing to ask the patient before the exam is whether or not they followed their prep. Check with your hospital to see if they require an enema, laxative, or a combination of both (with NPO instructions of course). The stool should be clear without any particles in it.

When mixing your barium bag, make sure you use luke-warm water for single contrast. If you are using pre-mixed barium for a double, then you can place it on top of a processor for about 20 minutes before the patient arrives to warm it. Or you could place the bag in the sink and let warm water run all around it. Which ever way you do it, the warm water is supposed to be less of a shock to the colon upon entry. The colon will spasm less during your radiographs, and it can contribute to patient comfort. Hey, every little thing helps, right?


Connect the balloon inflator, and always test the balloon by inflating it outside the patient. It is rare, but there can be manufacturer defects on basically any type of mass-produced supply, and you don't want the balloon failing on you in the middle of the procedure.

I always like to prepare to do a double-inflation. You can do this on one single squeeze of the inflator. Just keep the tube clamped during your test inflation while pulling the inflator off of the tube. Let the inflator re-gain its original shape, then re-attach it to the tube. Take the clamp off the tube, and when the balloon deflates, you will now have approximately "two puffs" or twice the amount of air required to inflate the balloon available in one squeeze. The inflator will be quite distended. This should be done with caution... never give more than one inflation of air without a Radiologist's approval. This method should only be done while inflating the balloon under fluoroscopic guidance (which is routine at my current facility). The Radiologist usually tells us when to stop inflating during the procedure. RISK OF PERFORATION OF THE COLON increases if not done under fluoro with Radiologist supervision.

I also like to place one piece of tape around all of the tubes in order to make the bag assembly easier to handle while the patient is turning during the procedure. have a strip of tape torn off and placed on the x-ray table so that after the balloon is inflated, you can apply this tape about 2 inches away from the inflator, and bind the inflator tube, the barium tube, and the blue tube (for giving the patient air) all together.

Another thing I've noticed is how poorly the clamps work on the barium tubing. Occasionally, the Radiologist will be inserting air into the bowel (by squeezing the blue bulb), and you will not be able to see air entering the intestine on the fluoro screen for quite some time. What is happening is that the air is escaping around the clamp on the tube and going into the bag. I will bet you a dollar that if you turn around and look at your barium bag, you'll be able to see it inflating while everyone else is watching the fluoro monitor! The bowel will receive the air eventually, but only after the bag has filled with air, and the pressure in the bag is greater than the pressure required for it to go into the colon. Carry some hemostats with you. I like to bend the tube, or put a kink in it, and place a hemostat over the tube in addition to the existing clamp. This will prevent air leakage into the bag.

During the Radiologist's fluoro routine, you should be manning the barium flow from the bag into the patient. I would suggest instead of using the clamp to leave the clamp open and pinch the tube with your fingers to control the flow. This allows you to stop the flow quickly during exposures by the Radiologist. You should attempt to stop the flow momentarily during the exposure to prevent motion on the film. Also, the barium should not flow in too fast, or you will risk perforation, and you should never let it flow beyond your field of view on the fluoro screen. You may never know you caused a perforation until the tower is moved, or the barium extravasates into your field of view. Sometimes, even if it does not perforate, it can go far into the small intestine before you even realize it, and that is not desirable for a good diagnostic study.

During the study, we radiographers wear many hats. We are responsible for the flow of the barium, assisting with patient movement/rotation, and changing films out of the fluoro tower (if you're still using a spot camera). We should also be keeping an eye on the table. If you are running barium into the patient and keep watching the fluoro monitor anxiously waiting to see it rush in, make sure it's not running off the table onto your shoes... trust me, it can happen. The tip just pops out sometimes.

Make sure you have a fluent overhead routine in the making. You should have pre-conceived which films you are going to do and in which order. If you're doing decubitus films, make sure to have a cassette loaded in a grid and placed in a grid-holder before the procedure begins (and don't be silly and leave it in the room during the procedure, as everyone has done at least once in the past). Once your scout is finished and you've set up for fluoroscopy, make sure to place the x-ray tube in a position near to the first image you will take. If you're going to do the decubs first, make sure you have a horizontal beam. If you're going to do the AP first, make sure you stay detented transversely to the table bucky, but have the tube out of the way for the fluoroscopy portion of the exam, etc.

Whenever you decide to perform the decubs, it can be difficult to think quickly for a technique that will work. We know that you will use 90 kV with double-contrast. If the decub is the first overhead you perform, you should be relatively good at guessing... I would suggest to do them last for a while until you become comfortable at guessing techniques. What you can do that works fairly well at most facilities is perform your AP or PA projection using AEC and pay attention to the mAs readout for the exposure. Use the exact same technique and you should be home free. Note - if you do the decubs last in your routine, some additional inflations of air may be required as it can dissipate and leak around the balloon during patient motion. 5-6 inflations right before you're ready to shoot each exposure should be enough.

The overheads themselves just take practice. All I can say to improve efficiency is to try to perform the same routine views in the same order every time. That way, you will not have to even think about the routine over time, and it will come naturally to you.

Last, but not least, I will offer this advice because of an experience I had with a student in the past. When removing the enema tip, don't put your face down there to try to see better. On one particular incidence, I remember pulling a student back (seemingly in slow motion) right as the remaining leftovers came shooting out. I think it missed the student's face by about an inch, and it must have projected about 5 feet from the patient. It was like a scene from the matrix when Keanau Reeves was dodging bullets. Never, under any circumstances, get that close!

I hope some of this information has been helpful, if not amusing!

Saturday, April 21, 2007

New Radiography Curriculum

The ASRT has just released a copy of its new curriculum which serves as a blueprint for the program requirements across the country, and ultimately influences what will be on the ARRT registry examination. The following is a summary of the new revisions:

"New content and objectives in this curriculum include human diversity, clinical competency, ethical considerations of genetics and a required general education component. Clinical and didactic competencies have been correlated. Content related to advanced modalities (e.g., quality management, computed tomography, magnetic resonance imaging and mammography) has been modified. Some content areas have been retitled or reorganized, and outdated content has been eliminated.

In addition to skill development in specific content areas, this curriculum is designed to ensure that entry-level radiographers possess the following basic traits upon graduation from an educational program in the radiologic sciences:

• The technical competence to perform diagnostic imaging procedures.
• Prudent judgment in administering ionizing radiation to produce diagnostic images.
• A focus on providing optimum patient care in a society that is becoming increasingly diverse and experiencing generational, cultural and ethnic shifts.
• The ability to work with others in a team relationship.
• An understanding of the intricacies associated with providing direct patient care in today’s health care setting.
• The skill to use modern technologies to research and retrieve information, weigh and discriminate between good and poor sources of information, and take action based upon the acquisition of new information and knowledge.
• Stewardship over the security and confidentiality associated with patient medical information.
• Skills that promote career-long learning, where the radiographer assumes the role of student and that of teacher.
• An eagerness to collaborate with others within the medical imaging community to promote standards of excellence in the medical imaging sciences.
• A willingness to contribute to the education and clinical skills development of radiologic science students."

The entire 134 page document and detailed description of new curriculum components can be downloaded on the ASRT website.

Kidney Tomography

Tomography can be defined as the radiographic technique that employs motion to show anatomical structures lying in a plane of tissue while blurring or eliminating the detail in images of structures above and below the plane of interest.

Tomographic principle: you must have 2 of the 3 elements in synchronous movement during your exposure (for kidney tomography, this would be the tube and image receptor, while the patient lies still). A panorex machine would be another example of the same principles.


The above diagram illustrates the necessary components:

You must have an adjustable fulcrum (pivot point) that allows you to change the area of beam focus. This is the "cm" adjustment you make between tomo slices, and should be adjusted to the hight of the anatomy of interest. I will discuss this momentarily.

Focal Plane: region in which the image exhibits satisfactory recorded detail, and is controlled by the level of the fulcrum. This region will show the least amount of radiographic motion, thus will appear clearly defined on the radiograph. Anything above or below this plane will be blurred due to tube/receptor motion.


Section thickness: Consider the above diagram in which the the width of the focal plane (represented by the vertical distance between points A and B )is controlled by the exposure (or tomographic) angle as seen in the above diagram. The exposure angle is inversely proportional to section thickness. As exposure angle increases, section thickness decreases. So in essence, if you want the whole kidney to appear more focused, you would have a narrow exposure angle (10 degrees for example), giving you a "thicker" cut. As in most IVP's, you want "thin" cuts (30-40 degrees for example), requiring three to four different slices at different incriments to visualize the whole kidney. The thinner your slice, the more detail for small parts will be visible. If there is a 2mm renal stone, you may not get a clear visualization of its structure or an accurate assessment of its location with a thick slice.

Remember that there are two arcs when talking about tomograms. When you "adjust the arc," you are adjusting the amount of exposure travel, not tube travel. The tomographic arc is how far the tube travels from start to finish, but remember that the exposure is not being made for the entire duration of travel. The tube must accelerate to a constant speed before the exposure begins, then the "exposure arc" starts.


Exposure factors:

Time – always set time first. Exposure time must = time required for exposure amplitude (or the minimum amount of time required for the tube to travel). Less time results in not enough blur. More time results in unwanted increase in density at the final tube position, increasing recorded detail and decreasing blur.

mA – usually a low mA setting required (10-50 mA). Wide angle tomograms usually require 30-50% more mAs than static films.

kV – Fine density adjustments must be accomplished by variations of kV because of the limitations of fixed-time settings. You must apply the 15% rule for density. Keep in mind that you should read the recommended kV range on the insert that comes with the contrast your facilty purchases. For nonionic iodinated contrast, that range is typically 65-70 kV.

Specialized Techniques:

Zonography – narrow angle tomography, usually less than 10 degree exposure amplitude. Used when a thick section is required (as in determining the location of a lung or renal lesion, cyst, or large stone). This method provides great contrast, but poor recorded detail due to the thickness of a section.

Wide-angle tomography – once a lesion has been localized, this is used to provide more specific detail. This is typically used for IVP’s with a series of thinner sections with varied focal points, as previously discussed. CT has taken over much usefulness for exams such as the bones of the inner ear. This method will be the most familiar to technologists today because it is used in routine IVP studies.

Panoramic tomography – used for curved surfaces of the head. Also known as orthopantomography, a lead mask is used over the xray tube which collimates the beam to a thin slit. The tube rotates around the patient’s head, and the film correspondingly rotates, staying perpendicular to the central ray. If you've never seen a panorex machine, you've probably never been to the dentist... time to go! The are simple to use and provide beautiful images, but are rarely seen in a hospital setting.

So how do I know how to set my focal point (adjust cm range)?

I'm sure you learned one rule of thumb in school or your clinical facility. There are many variances, so I'll choose the one I learned in school: Measure with calipers through the central ray of your kidney tomo (we'll say our pseudo-patient measures 21cm). Divide that number by 3 (21/3 = 7) and add 1 (7+1 = 8cm). That is my starting point for my scout.

Depending on what I see from my scout tomo, I can adjust to include slices focused throughout the kidneys. How do I do that? And why do I divide by three and add one cm? First, review the renal anatomy on this CT image:


If you notice the location of the kidneys, they lie approximately in the postierior 1/3 of the abdomen (remember the term "retroperitoneal"?). When you set your fulcrum, you are seting the distance from the image receptor to the part of the anatomy you want focused on your film. In this scenario, the kidneys lie approximately 8cm from the IR. Your scout image should be focused at the center of the kidney (with the renal pelvis showing clarity).

How do I adjust my settings to ensure that my tomo slices with contrast will all focus within the kidney?

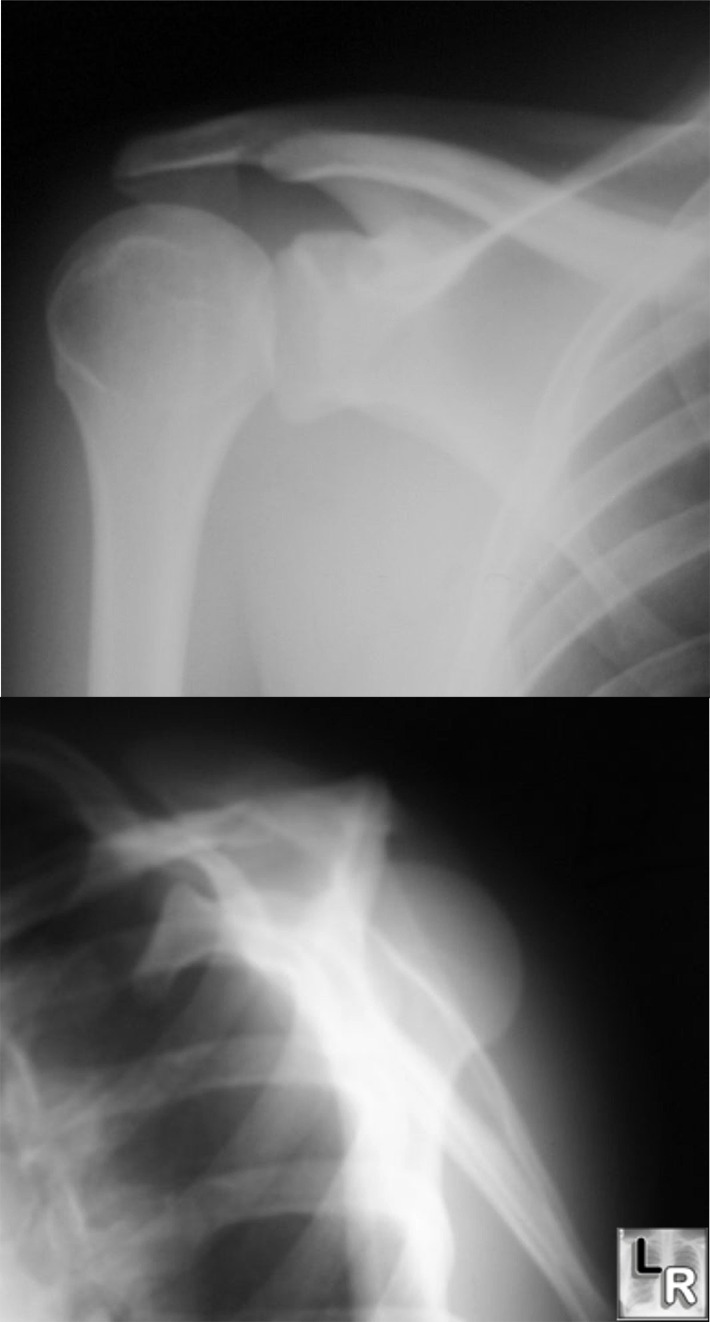
This really has a lot to do with film critique and good knowledge of anatomy. In this first image (I apologize for the crudeness of it), the lamina of the L-spine are seen very clearly in focus. We know that the lamina are posterior to the vertebral bodies, and even more importantly, lie in the same plane as the posterior aspect of the kidneys (see CT image for reference). If you have spinous processes focused in your image, you are way too posterior... you would need to increase your fulcrum point. If you originally set 7cm, try 9 or 10cm.


The second image displays a more acceptable focal point. The renal pelvis is in focus, and notice the part of the spine that is focused, the vertebral body. You can see clear, concise detail and if this were taken at 7cm, I would probably do additional cuts at 6cm and 8cm (one cm above and below this slice) because I know the renal pelvis lies in the approximate center of the kidney from anterior to posterior.


I hope this has been a practical post, and if there are any unclear concepts presented that need further elaboration, feel free to leave comments.

Thursday, April 19, 2007

Trauma "Y" Shoulder


Is it 100% possible to rule out dislocation with an AP shoulder? Most Radiologists would tell you that it rarely requires anything more than an AP view, but occasionally, you will need to get an additional "Y" view shoulder. It is possible to have a dislocation either anteriorly (more common) or posteriorly and have very little difference of appearance than a normal AP radiograph if one view is taken.

This is another way to obtain a "Y" view shoulder with the patient lying supine: Make sure the patient is perfectly flat with no rotation to either side. Place a 10 x 12 cassette crosswise under the patient's back. The center of the cassette should be directly over the midsagittal plane. I like to place the top of the cassette about 1 inch above the palpable acromion process (don't worry - the tube angulation will project the scapula over the film).


Angle your central ray 45 degrees to enter the patient's affected side at the surgical neck of the humerus and make sure to collimate. Just as in the trauma oblique c-spine technique (if using a grid), make sure that the cassette orientation is crosswise to avoid grid cutoff. Place the patient's affected hand on top of the abdomen if possible. If you are reluctant to collimate, just remember that the proximal humerus should superimpose the scapula... this is probably easier to line up than the standing PA oblique method - cone in to the humerus. This should be done on suspended respiration, and as a general rule of thumb, three times the mAs from the AP projection should be employed.

The following x-rays (courtesy of Learning Radiology) show a posterior dislocation... difficult to diagnose from AP view, but fairly easy to identify on the "Y" view.


After you have performed this view, you'll notice quite a bit of elongation.  Every once in a while, I will get a request for a repeat without elongation from either the ER physician or the radiologist.  If you can get cervical collar clearance, you can still do an AP projection for this view while supine.  I find that if you place a 45 degree sponge behind the patient's shoulders (as you might do with an oblique L-spine view), the Y shows up wonderfully as long as the patient's humerus remains parallel to the body.


Tuesday, April 17, 2007

Trauma C-Spine Obliques

So you've done your cross-table lateral C-spine and the Radiologist says "go ahead and finish the series without removing the collar," thinking there is a possibility of a fracture. The CT tech has been called in and you've got 30 minutes to obtain the rest of your series without moving the patient.

The AP and odontoid views go well after some creative tube angulation, but you're not quite sure you remember how to perform trauma obliques and your facility has misplaced their late 1970's version of Merrill's (all of this is hypothetical of course).

The best results can be obtained with proper placement of the film. Depending on the type of image receptor you are using (conventional film, CR, or DR), just remember one thing... if using a grid, place it crosswise so the gridlines run parallel with your tube angulation.

Plan to place the top of your film at the TEA (top of the ear attachment), or the center of your film at the level of C-4 / thyroid cartilage.


Center the spine over one half of your cassette (depending on which oblique you are performing first. The picture is simulating an LPO. This is a good starting point. The adjustment of your film from the patient's right to left will depend on body habitus. For instance, if there is more object to image distance (OID - from the spine itself to the IR) such as in larger patients, you may have to shift the cassette farther away from the central ray. If the patient is small (with small OID), the spine will possibly be centered more to the middle of the cassette.


Angle the tube 45 degrees entering the level of C-4 and approximately the level of the gonion. Just remember your CR will enter anteriorly to the EAM and take into consideration any minute skull rotation that will throw your CR off (don't center at the gonion if the patient's head is rotated 30 degrees to one side).

Perform the exact opposite of this oblique on the opposite side and you are home free!

Monday, April 16, 2007

Unclogging the NG tube

I would like to begin first by saying that you should NEVER do this without a Radiologist in the room and the permission of the attending physician:

I worked at a facility that would notoriously receive patients for NG tube insertion under fluoroscopy, and within a day or two later, the same patient would return with a clogged tube. The attending physician usually placed orders for replacement, but it wasn't always necessary.

The Radiologist, after a brief phone call with the attending, would obtain permission and cross-reference the patient's chart for allergies. We would load a catheter-tipped syringe with about 30 cc's of Diet Sprite (or any soda without food coloring) and slowly inject into the clogged NG tube. The carbonation was sufficient enough to unclog all the gunk that collected in the tube. We called it the "roto-rooter" exam and about 90% of the time, it would unclog the tube.

Now, before anyone goes to try this... a couple of things should be mentioned: If there's a possibility of perforation of the stomach or esophagus, this should not be attempted. Keep the same contraindications that would be present for using double-contrast (fizzies) for your GI series. Any recent GI surgery would also contraindicate this. And I'll repeat; NEVER do this without consulting a physician.

Of course, the best way to unclog these tubes is preventative measures... make sure that you (or the nursing staff at your facility) always flush NG tubes after use.

Caution! on Post-Pacer Chest X-Rays


I just thought I would write this down because I've recently, as well as in the past, seen students and veteran radiologic technologists do this and it scares me silly:

When you perform a chest x-ray on a patient who had a recent pacer insertion, make sure you do not raise the affected arm during your lateral chest projection. When the pacer is inserted, there are small leads that are anchored into the myocardium. I'm sure you've all seen it on fluoroscopy in the O.R. These leads have small screws on the ends that allow them to sink into the muscle tissue, but they need time to heal.

If you notice, most patients with a recent pacer/AICD have the arm of the side of insertion in a sling. This is done to prevent excessive patient movement. Only under the circumstance that the physicial specifically approves range of motion for the patient should you raise the affected arm for your lateral chest.

Check with your hospital's protocol to see how long after a pacer insertion it is alright to do this. If there is no protocol, it should be addressed with the chief Radiologist and/or Cardiologist to establish a guideline.

Alright, I'm off of my soapbox now :-)

Sunday, April 15, 2007

You might be an x-ray tech if...


You believe any job where you can drive to work in green pajamas is a cool job!

You wash your hands before you go to the bathroom!

When asked, "what color is the patient’s diarrhea?" you show them your shoes!

You know what a 3-H enema is ....High, Hot and Hell of a lot!

You have ever been in a death grip!

You have ever told a confused patient your name was that of a co- worker and to HOLLER if they need help!

Eating popcorn out of a clean bedpan is perfectly natural!

You can identify the kidney stone squirm at 20 feet!

You've ever had a patient with a nose ring, brow ring and 12 earrings say, "I'm afraid of needles!

You have to leave the patient's room before you begin to laugh uncontrollably!

You believe a roll of tape can fix any problem!

You say to yourself “great veins” when looking at a complete stranger in a grocery store!

You know beauty is not only skin deep....great trabeculation, nice odontoid!

The question of the day is to B.E. or not to B.E.!

You know that a hard beam tight collimation equals adequate penetration!

You know the acronym: Never Lower Tillie's Pants Grandma Might Come Home!

You know what "pop the film" means!

You have more white cardboard than you need!

You have x-rays of yourself at home that have never been read by a doctor!

You have copy x-rays of strange things, that you get out at parties!

You can tell if someone is faking or really hurt!

You have ever been sent to sterile supply to get fallopian tubes!

Somebody asks for a tip, and you say... the students!

You give somebody a hug, and feel for their iliac crest

You think it's perfectly normal to use a BE bag and tube as a funnel for binge drinking

You make comments like "the costophrenic angles are not showing when chest x-rays are shown on tv or movies.

You look up at the clouds and see an apple core carcinoma

When you watch ER, Nip Tuck, Scrubs, Etc. you look at the view box in the room and know that the PCXR is hanging upside down, along with the lateral c-spine, and the patient is in the ER because she is having a baby.

Then if you say to yourself and everyone in the room, who don't care because they aren’t in the medical field, those x-rays aren’t hanging right, and that is a major HIPAA violation!!!

You know the answers to:

But my left side does not hurt, just the right side of my chest hurts, why are you taking a picture of the left?

You don’t plan on putting that in me, do you? The doctor just said barium was involved.

Looking for tips on success through Radiography school?  Check out my book :-)

Thursday, April 12, 2007

Stick-Figure Tips on Lateral Elbows

It can sometimes be difficult to acquire the perfectly positioned lateral elbow. The following techniques can be applied to the walk-in patient or even a patient in the stretcher. I know this is probably elementary to most people reading this blog, but I really wanted an excuse to try out my stick-figure drawing skills.

Example 1 is what should NOT be done. If you notice the humerus, it is not parallel with the image receptor. This will result in the epicondyles not being parallel on your image, which causes rotation and an inability to visualize the joint space properly.

Example 2 is probably the easiest (or at least the most popular) method for performing the lateral elbow without having the patient sit far away from the table leaning over to lower the shoulder. Simply place a sponge underneath the cassette (or several sponges) to elevate the elbow joint to the level of the shoulder.
Example 3 is another way to do basically the same thing without a sponge. If you are fortunate enough to be working with equipment that will allow it, you can simply raise the table to place the elbow and shoulder in the same plane.
Example 4 is a great one to use when you have a tilt-table that will not elevate. There is typically a degree-marker on the tilt table that will tell you exactly how many degrees of angulation the table has on it. Simply match that degree reading with the tube angulation, and you have a perpendicular beam.
And of course, if the patient can do it, pull a “Fonzie.” Rotate the thumb so that it points parallel to your central ray and voila. More stick-figures to come!

Sunday, April 8, 2007

Questioning your GI patient

We all know that an experienced technologist will ask many questions before taking a scout film for an upper GI series. A typical prep is for the patient to be NPO past midnight of the night before the exam, and how many times do we walk into the waiting room to find a patient sipping on a mocha latte with a half-eaten pastry in the other hand? Here are a few things that technologists should be asking their GI patients before the procedure:

When was the last time you ate or drank anything? If it was clear liquids even recently, most Radiologists will let it slide because of the fast rate it will empty from the stomach. If it was anything else, make sure to write what it was and when the patient ate it in the history.

Have you had any abdominal surgeries? Another important question - it could have been a recent surgery that did not heal properly. In that case, there would be a perforation still, and barium can spill out into the peritoneal cavity to harden like cement after all the water is absorbed from it - a GI surgeon's nightmare. Besides, if the patient has had an obvious surgery that is visible once the Radiologist is performing the exam and you don't disclose that, you may be subject to receiving the "stink-eye" from the physician, or even worse, verbal reprimand in front of your patient.

Have they had a recent endoscopy? If it's been within the past couple of hours, there could still be a lot of air in the stomach, which may influence the amount of gas crystals you would use for a double-contrast study. Also, ask if they performed a biopsy during their endoscopy. It is possible to perforate the stomach during a biopsy, which could lead to the scenario described above. The Radiologist may decide to avoid using air contrast or use a water-soluble contrast agent such as Gastroview or Gastrograffin.

Have they been previously diagnosed with any conditions involving the stomach or esophagus? It sounds redundant, but I've experienced several patients who assume you have access to their entire medical history, and fail to mention they had an ulcer last year after gastric bypass surgery. This is just another way to be thorough.

Do you have any allergies? I have yet to experience a patient having an allergic reaction during a UGI, but it is possible. Barium, in and of itself, is an inert element which is impossible to have a reaction to, but there are preservatives added to the barium that make it possible for patients to have a response. It is rare, but I always include this in my pre-exam questioning.

Why are you having this exam? This is possibly the most important question you can ask. The answer might be "I have right lower quadrant pain." This might be disconcerting because we all know that the stomach is not in the right lower quadrant. However, you can further ask questions to see if studies have been performed to evaluate that pain (such as ultrasound to r/o appendicitis, small bowel series, or barium enema). Chances are, all or some of those may have been performed and were negative studies. Upon further questioning, you may learn that the patient might have found blood in their stool, but all other studies were normal.

Do you have blood in your stool? If so, is it dark red/brown or bright red? A dark color usually indicates bleeding from somewhere proximally in the GI tract; esophagus, stomach, or small intestine. Bright red blood indicates very low in the GI tract, either in the large intestine, or it could be hemorrhoids. It would also be beneficial to ask if the patient is anemic if they have blood in the stool, and to obtain a copy of their lab test results (if available).

And last, but not least, ask what types of medications the patient is taking. Sometimes, the history proves to be rather simple and uncomplicated, but then the patient states they are currently taking prilosec for GERD or Zantac... the point is, it is just another thorough way to evaluate the patient's condition, as well as obtain more information for the Radiologist. If the patient is taking medication, make sure to find out the doseage and frequency, as well as the last time they had their medication.

I'm sure there are some other questions that can be asked, but if any patient answers yes to a question, chances are that will lead to further investigation. As we all know, sometimes acquiring a good patient history can take slightly longer than the procedure itself, but it is more than worth it to the competent Radiographer.

Friday, April 6, 2007

Trans-thoracic Humerus Made Easy


Room Setup:

The easiest way to perform this view is to align your central ray with your image receptor prior to aligning the patient. Make sure that you align it high enough so you can pump up the stretcher to the desired central ray instead of having to adjust the tube and bucky. Set your 40 inch SID to the upright receptor and place your marker in one of the inferior corners of your light field after you collimate. As we know, the more we collimate, the greater our radiographic detail will be. So you can collimate from side to side at least two inches on a 10 x 12 cassette placed lengthwise if the patient can stand or sit upright in a stretcher (or make your light field about four finger-widths across), and crosswise if the patient will remain supine for the exam. The humeral head is only about the size of a racquet ball, so this should leave plenty of room as long as you align your patient properly.

When setting technical factors, a breathing technique is highly desired. I like to consider what type of technique to utilize for a lateral t-spine on my patient after viewing body habitus, and set that exact technique for male patients, and possibly one step lower in mAs for hyposthenic patients (your 84 year old grandmother who weighs 99 lbs). Your kVp should remain in the 70 – 75 range and of course, small focal spot should be selected to accommodate the low mA setting required for your breathing technique.

Performing the exam:

When bringing the patient in the room, make sure that they are bending at the waist by sliding them up if needed. You will also need the patient’s injured side close to the stretcher edge. Sit them upright (if possible) and proceed to aligning them.

I always like to align the patient like I were doing a lateral chest in the stretcher. Since you already aligned the bucky with the central ray, and you have collimated, leave the patient’s arms by their sides and align your light field so that the top of the light field enters just above the good side (or side up). For example, if you are performing a left humerus, leave the right arm down while aligning, and place the top of your light field just on top of the right humeral head before raising it.

Make some fine adjustments if needed by raising or lowering the stretcher or moving the stretcher foreword or backward. You may wish to “cock the box,” as I call it, or rotate the collimator housing to align with the plane of the affected humerus. Once you are all lined up, consider your technical factors and you’re ready to expose… almost. Don’t forget to raise the unaffected arm before you do. The patient should breathe normally (or sometimes instructed to breathe with slow deep breaths), and you should make a 3-4 second exposure during inspiration (because it takes longer than expiration).

Keep in mind that if there is a dislocation, the majority of humeral dislocations occur anteriorly. Just make sure to check your alignment on the side of interest before exposing and remove any artifacts that normally get in the way such as a bra or those pesky metal splint clips.

Thursday, April 5, 2007

Share the Wealth


I just wanted to start out with an intro to this blog.... my whole purpose for creating this is to contribute to any tricks of the trade, techniques, or best practices that radiographers typically have to learn over many years of practice.

I teach for a community college radiography program in North Carolina (and online for an advanced placement program in Arizona) and have found that school really only teaches the basics of our profession. The best programs offer formal instruction in the most common procedures performed in today's imaging subculture, but they offer it only once and at what seems like a rather accelerated rate. We all know that it takes many repititions and sometimes years of practice to feel confident during any exam or procedure, and that changes when you begin working at a new facility or if you spend time in another modality. School equips the student with basics... and direction for anything that is out-of-the-ordinary.

I do not want to make a blog geared toward the entry level student learning how to position for a chest x-ray (although you are more than welcome to contribute), but toward licensed technologists who are open-mindedly searching to better their skills and work toward mastery of their professions. I encourage anyone reading to offer advice or simply state what works for you. After all, I have definitely not seen it all, and it seems as if I learn something new every day in the Radiology department.

As my grandfather used to say, "you don't have to know how to do everything... just pick one thing, and do it well."

Here's a Quick Way to Speed Up Your Xray Exams

Beginning your clinical rotation in x-ray school can be overwhelming.  Not only are you plunged into a new environment, you are expected ...